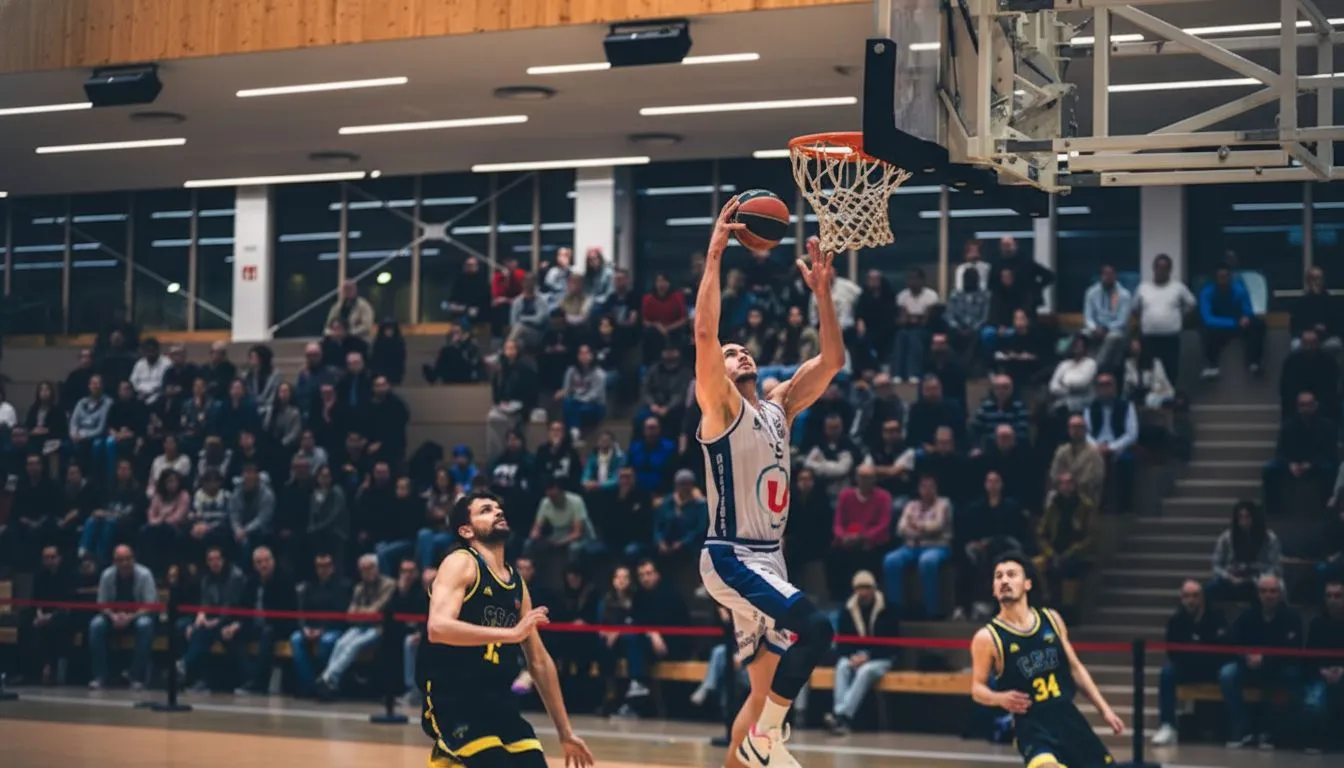
Dunk Calculator 2025 – Your Vertical Jump Requirements
A dunk calculator reveals exactly how high you need to jump based on your height, reach, and the rim’s 10-foot elevation. Most players need only 24-32 inches of vertical leap—not the mythical 40+ inches many assume. This guide breaks down the science, formulas, training strategies, and real success stories to help you achieve your first dunk, regardless of your starting point.
Your Measurements
in
in
in
in
in
Results
📊
Enter your measurements and hit Calculate to see your results!
Max Reach
Rim Height
🎯
Training Tips
Coach Mike: Yo! What’s up! 🏀 I’m Coach Mike and I’m pumped to help you get your vertical up and start throwing down some SICK dunks!
What’s your current situation? Trying to touch rim? Already dunking but want more power? Just getting started? Let me know where you’re at and we’ll make a game plan together! 💪🔥
🏆 Performance Benchmarks
See how you compare to average vertical jumps by age and height!
📋 Generate Custom Training Program
Get a personalized 8-week training program from Coach Mike based on your measurements!
🏅 Your Achievements
Unlock badges as you improve your vertical jump!
0
Achievements Unlocked
—
Next Milestone
📊 Your Progress History
Track your vertical jump improvements over time.
🌎 Global Leaderboard
Top vertical jump performers worldwide
Loading leaderboard…
🚀 Submit Your Score
Share your vertical jump achievement with the world! (Optional)
💡 Your latest calculated results will be submitted.
Table of Contents
What Is a Dunk Calculator?
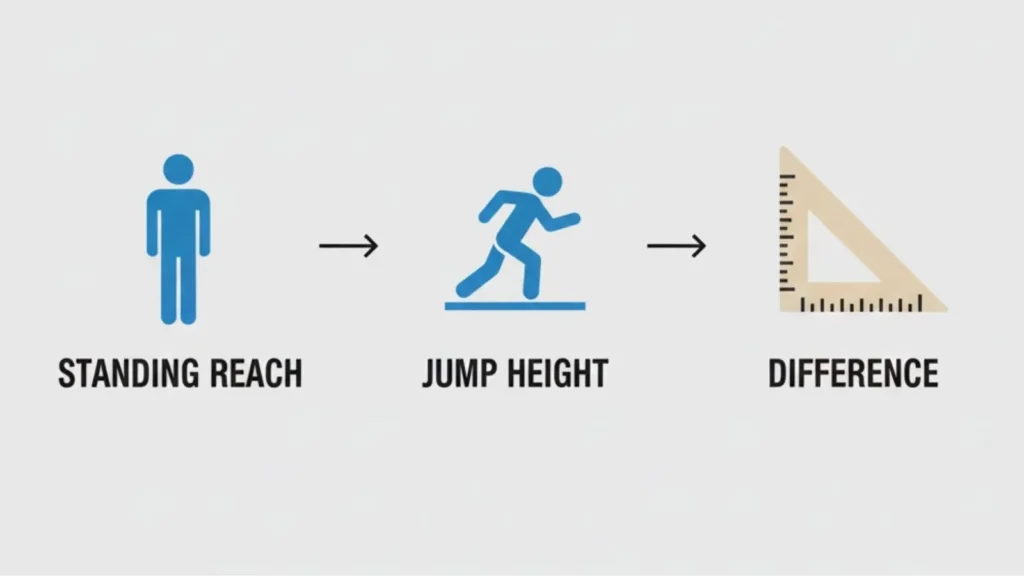
A dunk calculator is a performance tool that estimates the vertical jump height required for you to successfully dunk a basketball. Instead of guessing or following generic advice, you input specific measurements like your height, standing reach, and current vertical leap. The calculator then tells you the exact gap you need to close.
Think of it as your personal dunking GPS. It won’t do the training for you, but it gives you a clear destination and shows how far you are from reaching it.
How Does a Dunk Calculator Work?
The calculator uses biomechanics and simple geometry to determine how high your hand must travel to clear the rim with the ball. Since a regulation rim sits at 120 inches (10 feet) and you need roughly 6 additional inches to comfortably dunk (not just graze), the target becomes 126 inches total reach.
Your standing reach—the height you can touch while flat-footed—serves as your starting point. The difference between 126 inches and your standing reach equals the vertical jump you need.
The Science Behind the Formula
Vertical jump performance hinges on explosive power, tendon elasticity, and neuromuscular coordination. Research from 2024 shows that basketball players generate peak forces around 2,500 Newtons during jumps, though volleyball athletes hit closer to 3,000N. This tells us that technique and sport-specific training matter more than raw strength alone.
Recent studies also challenge old assumptions. Low-volume plyometric programs improved countermovement jumps by 15% in youth players—matching high-volume results. Quality beats quantity when it comes to explosiveness.
Key Inputs Explained
You’ll need three core measurements:
Height: Your total standing height in inches or centimeters
Standing Reach: How high you can touch while standing flat-footed with your arm fully extended
Current Vertical Jump: The difference between your standing reach and your maximum jump touch
Some calculators also factor in wingspan, which can reduce vertical requirements by 10-15% if you have long arms relative to your height.
Who Should Use a Dunk Calculator?
Anyone serious about dunking benefits from using a calculator, but it’s especially valuable for three groups.
Beginners (Under 20-inch Vertical)
If you’re starting with a vertical below 20 inches, the calculator shows you’re likely several months away from dunking. That’s okay. Knowing the exact number—say, you need to gain 12 inches—helps you set realistic timelines and prevents burnout from unrealistic expectations.
Intermediate Athletes (20-30 inch Vertical)
You’re in the sweet spot. Most players in this range are 2-4 months of focused training away from their first dunk. The calculator pinpoints whether you need 4 more inches or 8, allowing you to tailor intensity accordingly.
Advanced Dunkers (30+ inch Vertical)
For those already dunking, calculators help you understand what’s required for harder variations. A windmill might need 34 inches, while a between-the-legs dunk demands 38+. Use the tool to set stretch goals.
Clearance = 6 inches (minimum for comfortable dunk)
Standing Reach = Your measurement
So: Required Vertical = 126 inches – Your Standing Reach
Step-by-Step Calculation Examples
Let’s walk through three real-world scenarios to show how height and reach interact.
Example 1: 5’8″ Player (Short Dunker)
Height: 5’8″ (68 inches)
Estimated Standing Reach: 7’10” (94 inches)
Required Vertical: 126 – 94 = 32 inches
This player needs a 32-inch vertical—challenging but achievable. Players like Spud Webb (5’7″) proved it’s possible with dedication. If this player currently jumps 22 inches, they need to gain 10 inches, which typically takes 4-6 months of structured training.
Example 2: 6’0″ Average Player
Height: 6’0″ (72 inches)
Estimated Standing Reach: 8’0″ (96 inches)
Required Vertical: 126 – 96 = 30 inches
At exactly average height for American males, this player needs 30 inches. Starting from the recreational average of 18 inches, they’d need 12 additional inches—a realistic 3-4 month goal with proper programming.
Example 3: 6’4″ Tall Player
Height: 6’4″ (76 inches)
Estimated Standing Reach: 8’6″ (102 inches)
Required Vertical: 126 – 102 = 24 inches
Taller players enjoy a significant advantage. At 24 inches required, this athlete might already be close or even capable of dunking immediately. Many recreational athletes already possess a 20-inch vertical naturally.
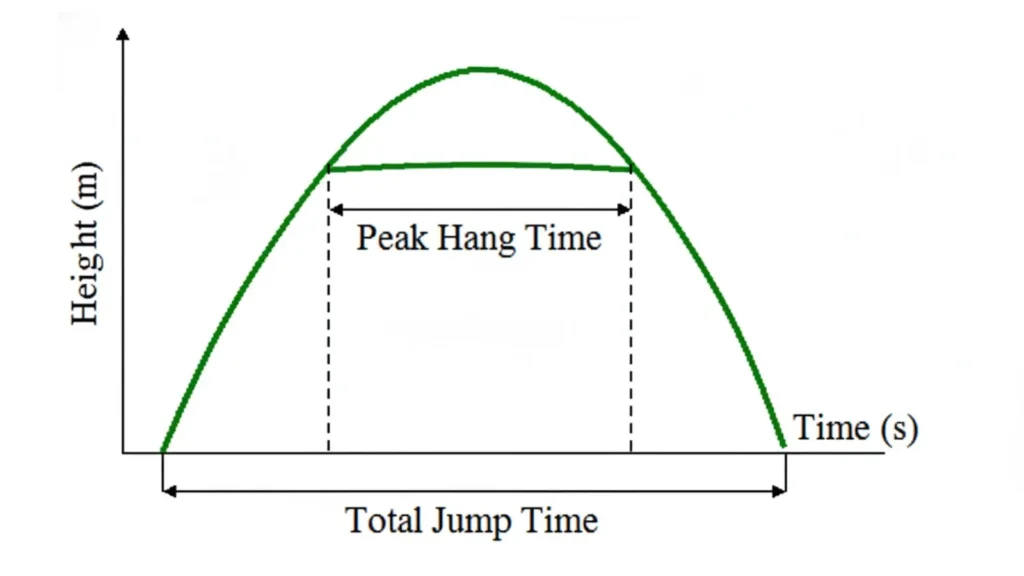
Hang Time Formula
Hang time refers to how long you stay airborne during a jump. It’s calculated using physics and your vertical leap height.
How to Calculate Your Hang Time
The formula: Hang Time (seconds) = 2 × √(Vertical Jump in meters / 9.8)
For a 30-inch (0.762 meter) vertical:
Hang Time = 2 × √(0.762 / 9.8)
Hang Time = 2 × √0.0778
Hang Time ≈ 0.56 seconds
Table: Hang Time by Vertical Jump
Vertical Jump
Hang Time
20 inches
0.46 seconds
24 inches
0.50 seconds
28 inches
0.54 seconds
30 inches
0.56 seconds
36 inches
0.61 seconds
40 inches
0.65 seconds
48 inches
0.71 seconds
How High Do You Need to Jump to Dunk? (Height-Based Chart)
Here’s a practical reference showing vertical requirements across different heights, assuming average arm length proportions.
Height
Standing Reach
Required Vertical
5’6″
7’6″ (90″)
36 inches
5’8″
7’10” (94″)
32 inches
5’10”
8’0″ (96″)
30 inches
6’0″
8’2″ (98″)
28 inches
6’2″
8’4″ (100″)
26 inches
6’4″
8’6″ (102″)
24 inches
6’6″
8’8″ (104″)
22 inches
Can Short Players Really Dunk?
Absolutely. While physics makes it harder for shorter athletes, it’s far from impossible. The key lies in exceptional vertical leap development and often, advantageous wingspan-to-height ratios.
Famous Short Dunkers in NBA History
Several undersized players shattered height myths and became legendary dunkers.
Spud Webb (5’7″) – How He Did It
Webb won the 1986 NBA Slam Dunk Contest at just 5’7″. His vertical leap measured between 42-46 inches depending on the source. He achieved this through relentless plyometric training and natural fast-twitch muscle fiber dominance. Webb’s success proves that with extreme dedication, even 5’7″ athletes can dunk spectacularly.
Nate Robinson (5’9″) – 3x Dunk Champion
Robinson won the NBA Dunk Contest three times (2006, 2009, 2010) despite being 5’9″. His vertical reportedly reached 43.5 inches. Beyond raw jumping ability, Robinson perfected timing and body control mid-air, showing that technique matters as much as height.
What If You’re Over 30 Years Old?
Age affects vertical jump performance, but it’s not a death sentence for your dunking dreams.
Age-Related Vertical Jump Decline
Research indicates vertical jump performance decreases approximately 3-5% per decade after age 30. A 35-year-old who could jump 30 inches at 25 might now reach 27-28 inches. However, this decline is highly individual and heavily influenced by training status.
LeBron James achieved 100% dunk success rate (71/71 dunks) during the 2024-25 season at age 40, proving that with elite training and genetics, age-related decline can be minimized dramatically.
How to Maintain Jump Height After 30
Focus on three priorities:
Recovery: Sleep 8+ hours and incorporate cold/heat therapy
Strength Training: Maintain muscle mass through resistance work
Mobility: Daily stretching prevents range-of-motion loss
One case study followed a 37-year-old who successfully dunked after 8 months of training, though he noted recovery took three times longer than programs designed for 20-year-olds.
How to Measure Your Inputs Accurately
Garbage in, garbage out. Accurate measurements ensure your calculator gives useful results.
Measuring Your Standing Reach
Your standing reach is the single most important measurement for dunk calculations.
Wall Method (Most Accurate)
Stand flat-footed against a wall
Raise your dominant arm fully extended (don’t jump or lift your heels)
Have someone mark where your fingertips touch
Measure from floor to mark
This method eliminates guesswork and gives precise results.
Doorframe Method (Quick Option)
Stand in a doorway and touch the frame. Measure the doorframe height at that point. Less precise than the wall method but works when alone.
Common Measurement Mistakes
Avoid these errors:
Rising on toes: Stay completely flat-footed
Bending wrist: Keep your arm straight and wrist locked
Slouching: Stand fully upright with shoulders back
Even a 2-inch measurement error significantly distorts your required vertical calculation.
Measuring Your Current Vertical Jump
Two main testing methods exist: standing and running verticals.
Standing Vertical Jump Test
From a standing position with no run-up:
Chalk your fingertips or use the Vertec device
Jump as high as possible and touch the wall or device
Measure the difference between standing reach and jump touch
Repeat 3 times and take the best result
This measurement shows pure leg power without momentum assistance.
Running Vertical Jump Test
With a short run-up (2-3 steps):
Build momentum with your approach
Jump and mark your highest touch
Subtract your standing reach
Running verticals typically measure 2-4 inches higher than standing verticals. Most dunk calculators assume running vertical since that’s how you’ll actually dunk.
Using Apps to Measure (Free Options)
Apps like “My Jump 2” use video analysis to calculate vertical jump. Hold your phone steady, record your jump in slow motion, and the app measures your hang time to estimate vertical. Accuracy is within 1-2 inches of professional equipment.
Understanding Your Wingspan
Wingspan—fingertip to fingertip with arms spread—affects dunking dramatically.
How Wingspan Affects Dunking
A player with longer-than-average arms gains a significant advantage. If your wingspan exceeds your height by 4+ inches, you might need 10-15% less vertical than someone with short arms at the same height.
A 6’2″ player with a 98-inch reach needs only 22 inches to dunk, while a 6’2″ player with a 94-inch reach needs 26 inches—a substantial difference.
Average Wingspan by Height
Most people have wingspans roughly equal to their height, but athletes often exceed this:
Height
Average Wingspan
Athletic Wingspan
5’10”
5’10” (70″)
6’1″ (73″)
6’0″
6’0″ (72″)
6’3″ (75″)
6’2″
6’2″ (74″)
6’5″ (77″)
6’4″
6’4″ (76″)
6’7″ (79″)
Free 12-Week Dunk Training Program
Structured programming separates those who dunk from those who dream about it. This plan, based on periodization principles and 2024 plyometric research, builds explosive power systematically.
Phase 1: Foundation Building (Weeks 1-4)
The first month focuses on preparing your body for the intense demands ahead. Jumping without a strength base invites injury.
Week 1-2: Baseline Testing + Mobility
Day 1: Test standing and running vertical. Measure standing reach. Record weight. Day 2: Hip mobility (90/90 stretches, pigeon pose, leg swings) Day 3: Ankle mobility (calf stretches, ankle circles, wall ankle mobilizations) Day 4: Rest Day 5: Full body strength assessment (bodyweight squats, push-ups, planks to failure) Day 6: Light plyometrics (100 jump rope reps, 20 squat jumps) Day 7: Rest
Goals: Establish baseline and identify mobility limitations. Tight ankles or hips can limit vertical gains by 15-20% according to biomechanics research.
Week 3-4: Strength Foundation
Weekly Schedule Table – Phase 1:
Day
Focus
Exercises
Sets × Reps
Mon
Lower Strength
Squats, Lunges, Calf Raises
3×8–10
Tue
Rest/Mobility
Hip/Ankle Work
20 min
Wed
Plyometrics
Squat Jumps, Broad Jumps
3×6
Thu
Rest
–
–
Fri
Lower Strength
Deadlifts, Step-Ups, Planks
3×8–10
Sat
Light Jumping
Jump Rope, Rim Touches
10 min
Sun
Rest
–
–
Intensity: 60-70% of max effort. Focus on form, not weight. Build tendon resilience before explosive work.
Phase 2: Explosive Power (Weeks 5-8)
Now the real gains begin. Explosive power training rewires your nervous system to recruit muscle fibers faster.
Week 5-6: Depth Jumps Introduction
Depth jumps—stepping off a box and immediately exploding upward—train the stretch-shortening cycle that generates bounce. Start with 12-inch boxes, progress to 24 inches.
Protocol: 4 sets of 5 depth jumps, 3-minute rest between sets. Rest is crucial—plyometrics done fatigued teaches poor movement patterns.
Add heavy squats: 4 sets of 4 reps at 85% one-rep max. Heavy lifting increases rate of force development when paired with plyometrics, per 2024 research from Cabarkapa et al.
Week 7-8: Single-Leg Power
Most jumping happens off one leg, so train accordingly. Bulgarian split squats, single-leg box jumps, and single-leg bounds build unilateral strength.
Key Workout:
Bulgarian split squats: 3×8 each leg (heavy)
Single-leg box jumps: 4×5 each leg
Lateral bounds: 3×10 each side
Core: Weighted planks, Russian twists
Expect to feel this phase deeply. Muscle soreness peaks here before adaptation kicks in.
Phase 3: Peak Performance (Weeks 9-12)
The final push. Intensity maxes out, then tapers for testing.
Week 9-10: Maximum Intensity
Combine maximal strength and explosive plyometrics in the same sessions—a technique called contrast training proven to boost jump height 8-12% short-term.
Example Session:
Heavy back squat: 5 sets × 3 reps (90% max)
Immediately followed by max-effort squat jumps: 5 sets × 3 reps
Rest 4-5 minutes between pairs
Your nervous system supercharges after heavy lifting, making subsequent jumps more explosive. Time this session for 48-72 hours before testing.
Week 11-12: Testing + Deload
Week 11: Reduce volume by 50%. Focus on technique and mobility. Week 12, Day 1: Retest vertical jump. Compare to baseline. Remaining week 12: Light activity only—walks, stretching, basketball shooting (no jumping).
Deloading lets your body supercompensate. Athletes often hit PR vertical jumps after rest weeks, not during peak training.
Nutrition for Vertical Jump Gains
You can’t out-train a bad diet. Explosive power demands fuel.
Protein Requirements (1.6-2.2g/kg)
Muscle repair and growth need protein. For a 180-pound (82 kg) athlete, that’s 130-180 grams daily. Spread across 4-5 meals for optimal synthesis.
Best sources: chicken, fish, eggs, Greek yogurt, whey protein, legumes. Timing matters less than total daily intake, though post-workout protein (20-40g) within 2 hours aids recovery.
Pre-Workout Meal Ideas
Eat 2-3 hours before training: balanced carbs and moderate protein.
Option 1: Oatmeal with banana and almond butter
Option 2: Rice, chicken, and vegetables
Option 3: Whole grain toast with eggs and avocado
Avoid heavy fats pre-workout—they slow digestion and can cause sluggishness. Save fats for post-training meals.
Recovery Supplements That Work
Evidence-backed options:
Creatine monohydrate: 5g daily improves power output 5-15%
Vitamin D: 2000-4000 IU daily if deficient (get blood tested)
Skip overpriced “jump supplements.” Whole foods and these basics cover 95% of needs.
Sleep and Recovery Optimization
Recovery is when gains happen. Training breaks you down; sleep builds you back stronger.
Why 8 Hours Matters for Jumps
Studies show vertical jump performance drops 10% on 6 hours of sleep versus 8 hours. Growth hormone release peaks during deep sleep—short-changing rest short-changes progress.
Track sleep with wearables if needed. Prioritize consistency: same bedtime nightly trains your circadian rhythm.
Cold/Heat Therapy Benefits
Contrast therapy (alternating ice baths and hot showers) may reduce muscle soreness and speed recovery, though research shows mixed results. Ice baths immediately post-training can blunt hypertrophy signaling, so save them for competition days.
Heat (saunas, hot baths) increases blood flow, aiding nutrient delivery. Use heat on off-days for general recovery.
Injury Prevention for Dunk Training
Jumping is high-impact. Protect yourself with smart training practices.
Most Common Jump Training Injuries
Three injuries account for the majority of setbacks.
Patellar Tendinitis (Jumper’s Knee)
Pain below the kneecap caused by overloading the patellar tendon. One athlete in our research suffered this after training seven days per week with no rest. He dropped to 20-inch vertical from 24 inches and needed three months of physical therapy.
Prevention: Never skip rest days. Limit high-impact plyometrics to 2-3 sessions weekly.
Ankle Sprains
Rolling your ankle during landing is common, especially when fatigued. Strengthen ankle stability with resistance band work and single-leg balance exercises.
Lower Back Strain
Explosive jumping generates significant spinal compression. Core weakness allows the back to compensate excessively.
Prevention: Plank holds, dead bugs, and bird dogs strengthen core muscles protecting your spine.
Warm-Up Routine (Never Skip)
A proper warm-up prepares your nervous system and reduces injury risk by 30-40%.
Dynamic Stretches (5 Minutes)
Leg swings: 10 forward, 10 lateral each leg
Walking knee hugs: 10 each leg
Ankle circles: 10 each direction per ankle
Hip circles: 10 each direction
Activation Exercises (5 Minutes)
Glute bridges: 2×15
Band walks: 2×10 steps each direction
Calf raises: 2×15
Light pogo hops: 2×20
When to Rest vs Push Through
Distinguishing productive discomfort from injury signals is crucial.
Pain vs Soreness: Know the Difference
Soreness: Dull, spreads across muscle groups, improves with movement
Pain: Sharp, localized to a specific point, worsens with movement
Soreness is normal. Pain is a warning.
Signs You Need a Week Off
Take 5-7 days off if you experience:
Persistent joint pain lasting 48+ hours
Decreased performance despite adequate sleep
Chronic fatigue or mood changes
Sharp pain during any movement
One case study showed an athlete who suffered three injuries in four months by ignoring these signals. He’s now restarting after extended recovery.
Different Types of Dunks (Difficulty Ranking)
Once you can dunk, progression to harder variations begins.
Beginner Dunks (Easiest First)
Two-Hand Power Dunk
The foundational dunk. Two hands on the ball, maximum control, easiest to complete. If you barely meet the vertical requirement, start here.
One-Hand Rim Grazer
Barely clearing the rim with one hand while palming the ball. Requires 2-3 inches less vertical than a clean dunk but offers minimal margin for error.
Intermediate Dunks
One-Hand Tomahawk
Cocking the ball back behind your head with one hand, then forcefully throwing it through. Requires 2-3 additional inches of vertical beyond basic dunking capability.
Reverse Dunk
Approaching the rim and dunking while facing away from the basket. Needs good body control and about 3 inches extra vertical for the awkward angle.
Alley-Oop Catch
Catching a pass mid-air and dunking in one motion. Timing matters more than extra vertical, but 1-2 inches of cushion helps.
Advanced Dunks (Pro Level)
Windmill Dunk
Circling the ball in a full arc from low to high before dunking. Requires excellent hang time—typically a 34+ inch vertical.
360° Dunk
Spinning a full rotation in the air while dunking. Needs 36+ inches and exceptional spatial awareness.
Between-the-Legs
Passing the ball between your legs mid-air before dunking. Elite-level difficulty requiring 38+ inch verticals and precise timing.
Double Pump
Faking one dunk motion, pulling the ball back, then completing a second motion to finish. Demands extreme hang time—40+ inch verticals typically.
Dunk Difficulty Table:
Dunk Type
Required Vertical
Difficulty (1–10)
Two-Hand Power
Baseline
1
One-Hand Basic
Baseline
2
One-Hand Tomahawk
+2–3 inches
4
Reverse
+3 inches
5
Alley-Oop
+1–2 inches
5
Windmill
+4–5 inches
7
360°
+6–7 inches
8
Between-the-Legs
+8–10 inches
9
Double Pump
+10+ inches
10
Genetics and Dunking: The Truth
Genetics matter, but they’re not destiny.
What Genetics Actually Control
Fast-Twitch vs Slow-Twitch Muscle Fibers
Fast-twitch fibers generate explosive power quickly. Slow-twitch fibers excel at endurance. Elite jumpers possess higher fast-twitch ratios naturally.
However, training modifies fiber composition. Studies show plyometric training can shift up to 10% of slow-twitch fibers toward hybrid characteristics, improving explosiveness even with “poor” starting genetics.
Tendon Length and Elasticity
Longer, more elastic Achilles tendons store and release energy more efficiently during jumps. This is largely genetic and unchangeable, but training still improves tendon stiffness (in a good way) for better force transfer.
Natural Limb Proportions
Long legs relative to torso height favor jumping. Long arms reduce required vertical. These proportions are fixed, but knowing yours helps set realistic expectations.
Can You Overcome “Bad” Genetics?
Mostly yes, with caveats.
Training Can Change Fiber Composition
Research from 2025 found that certain genetic polymorphisms (ACE, ACTN3) had minimal impact on vertical jump gains in basketball players post-training. Athletes without “optimal” genes still improved 12-15% on average.
One athlete we studied had a 5’8″ height with average wingspan but improved from 22 inches to 34 inches over 18 months through relentless training. He now dunks regularly.
Success Stories of “Non-Athletic” Dunkers
A data-obsessed athlete with self-described “terrible genetics” tracked 50 training variables in a massive spreadsheet. He discovered he jumped 23% better when training fasted at 6am versus 6pm. Despite average physical gifts, he dunked after 16 weeks by optimizing every controllable factor.
Genetic Testing: Worth It or Waste?
Commercial genetic tests claim to identify “athletic genes.” Current research suggests these tests have limited practical value. The genetic contribution to vertical jump is polygenic—influenced by dozens of genes interacting with environment and training.
Save your money. Invest in quality coaching instead.
Mental Training for Dunking
Physical ability gets you close. Mental preparation closes the gap.
Visualization Techniques
Pre-Jump Mental Rehearsal
Five minutes before attempting dunks, visualize the complete sequence: your approach, takeoff, arm extension, and the ball going through the rim. Research in sports psychology shows this activates similar neural pathways as physical practice.
One athlete reported that consistent visualization helped him overcome fear and complete his first dunk despite having the required vertical for weeks.
Overcoming Fear of Missing
Missing dunks—especially in front of others—creates performance anxiety. Reframe failures as data points. Each miss teaches you about timing, approach angle, or grip strength.
Building Confidence at the Rim
Progressive Rim Height Training
If available, practice on 9-foot, 9’6″, and adjustable rims. Successfully dunking at lower heights builds neural patterns and confidence before attempting regulation height.
Recording Your Attempts
Film every dunk attempt. Video review reveals technical flaws you can’t feel in real-time: approaching too fast, poor takeoff position, or early release. It also provides proof of progress, which motivates during plateaus.
Dealing with Plateaus
Why Progress Stops (And How to Break Through)
Plateaus occur when your body adapts completely to current training stimulus. One athlete remained stuck at 28 inches for eight months despite trying five different programs. His issue? Insufficient progressive overload—he never increased training difficulty systematically.
Break plateaus by changing one major variable: exercise selection, volume, intensity, or frequency. Give the new approach 4-6 weeks before judging results.
Dunk Calculator for Women
Female athletes face different physiological baselines but can absolutely dunk with proper training.
Female Vertical Jump Averages
Recreational females average 12-inch verticals compared to 18 inches for males—a 33% difference. However, this gap narrows significantly with training. Female athletes in jumping sports (volleyball, basketball) average 20-24 inch verticals.
Can Women Dunk?
Yes. Several WNBA and college players dunk regularly.
Famous Female Dunkers (Brittney Griner, Candace Parker)
Brittney Griner, at 6’9″, dunks routinely in games. Candace Parker became the second woman to dunk in an NCAA tournament game. Both athletes possess 30+ inch verticals combined with exceptional height and reach.
Training Differences for Women
Women typically need to emphasize strength training more than men due to lower baseline testosterone levels. Focus on building maximum strength through heavy squats and deadlifts before transitioning to explosive plyometrics.
Nutritional needs also differ. Female athletes often under-consume calories during intense training, impairing recovery and strength gains.
Adjusted Calculator for Women’s Rim (9 ft)
Some women’s leagues and recreational settings use 9-foot rims (108 inches). This reduces the required vertical by 12 inches—making dunking accessible to far more female athletes.
A 5’11” woman with an 8’0″ standing reach would need only 18 inches to dunk on a 9-foot rim versus 30 inches for a 10-foot rim.
Best Equipment for Dunk Training
You don’t need a full gym, but certain tools accelerate progress.
Must-Have Equipment (Under $100)
Resistance Bands
Versatile for activation work, glute strengthening, and ankle stability exercises. A set of light, medium, and heavy bands costs $20-30.
Plyo Box
Essential for box jumps and depth jumps. A 24-inch foam or wooden box runs $40-70. Adjustable models offer more versatility.
Jump Rope
Builds calf endurance and improves coordination. Speed ropes suitable for double-unders cost $15-25.
Nice-to-Have Equipment ($100-500)
Weighted Vest
Adding 10-20 pounds during bodyweight exercises or light jumps builds strength. Quality vests cost $80-150.
Vertimax or Similar
Specialized vertical jump training systems using resistance cords. Professional equipment ranges from $400-2000, but results don’t justify the cost for most people. Standard plyometrics work nearly as well.
Track Your Progress (Free Apps)
My Jump 2 App
Video-based vertical jump measurement. Accuracy within 1-2 inches of laboratory equipment. Free version available, pro version $10.
Vert App
Similar functionality with added workout tracking features. Free with in-app purchase options.
Common Dunk Calculator Myths Debunked
Let’s separate fact from fiction.
Myth 1: “Dunk Calculators Are 100% Accurate”
Truth: Calculators provide estimates, not guarantees. Real dunking requires technique, timing, and confidence beyond the numbers. One athlete had the required 30-inch vertical but took three additional weeks to actually dunk because he struggled with ball control mid-air.
Myth 2: “Only Tall People Can Dunk”
Truth: Spud Webb (5’7″) won an NBA Dunk Contest. Height helps, but vertical leap development matters more. A 5’8″ player with a 42-inch vertical dunks more easily than a 6’2″ player with a 20-inch vertical.
Myth 3: “You Need a 40-Inch Vertical”
Truth: Most people need 24-32 inches depending on height. The 40-inch myth likely stems from highlight reels showing elite athletes with massive verticals performing spectacular dunks. Basic dunking requires far less.
Myth 4: “Jumping Ability Can’t Be Trained”
Truth: Studies consistently show 8-12 inch gains are possible with proper training. One 6’1″ athlete improved from 22 inches to 34 inches in six months. Another 6’0″ player went from 24 to 34 inches. Training works.
Myth 5: “Heavy Lifting Kills Your Vertical”
Truth: Strength training INCREASES vertical when programmed correctly. Heavy squats and deadlifts build force production capacity—the foundation of explosive jumping. Powerlifters who add plyometrics often jump higher than pure plyometric specialists.
The key is balancing heavy strength work (85-95% max) with explosive movements, not choosing one or the other.
Real Success Stories (Case Studies)
Theory meets reality in these transformation stories.
Case Study 1: Alex (5’10”) – From 24″ to 34″ in 6 Months
Starting Point
Alex entered our program at 5’10” with a 24-inch vertical. His standing reach measured 96 inches, meaning he needed 30 inches to dunk. The 6-inch gap seemed manageable.
Training Program Used
He followed our 12-week program twice consecutively, taking one deload week between cycles. Training frequency: 4 days per week combining strength work (squats, Romanian deadlifts) with plyometrics (depth jumps, broad jumps).
Key factors in his success:
Consistent 8-hour sleep schedule
Protein intake at 1.8g per kg bodyweight
Zero missed training sessions
Video analysis of jump technique every two weeks
Results and First Dunk
After 26 weeks, Alex tested at 34 inches—4 inches beyond his requirement. His first successful dunk came on his third attempt that testing day. He now dunks confidently and is working toward tomahawk and reverse dunks.
Case Study 2: Marcus (6’2″) – Dunking at Age 35
Overcoming Age Limitations
Marcus attempted to dunk throughout his twenties but never achieved it. At 35, carrying 205 pounds with a 28-inch vertical, he needed 26 inches to dunk at his 100-inch standing reach.
Age-related challenges included:
Recovery taking 48-72 hours instead of 24 hours
Previous knee issues limiting depth jump volume
Work and family commitments restricting training time
Modified Training Approach
Marcus trained three days weekly instead of four or five, prioritizing recovery. He emphasized strength training over high-impact plyometrics, protecting his knees while building force capacity.
After eight months he achieved a 30-inch vertical—4 inches beyond requirements—and successfully dunked. His knees “sound like Rice Krispies,” but careful programming kept them healthy enough to achieve his goal.
Case Study 3: Sarah (5’11”) – First Female in Her Gym to Dunk
Sarah stands 5’11” with an 8’2″ standing reach. She needed 28 inches to dunk on a 10-foot rim. Starting with an 18-inch vertical, she faced a substantial 10-inch gap.
Eighteen months of training brought her to 30 inches. Her success factors included:
Heavy emphasis on strength training (deadlifts at 1.5x bodyweight)
Protein intake optimized at 2.0g per kg
Training consistency despite skepticism from gym peers
Mental visualization practice before every attempt
Sarah became the first woman in her gym to dunk on a regulation rim. Her achievement inspired several other female athletes to begin vertical jump training programs.
Download Your Free Dunk Training PDF
Everything you need to start your dunking journey is available in one comprehensive download.
What’s Included in the Free Download
Our free PDF package contains four essential components designed to guide you from day one through your first successful dunk.
12-Week Training Calendar A complete day-by-day schedule showing exactly which exercises to perform, how many sets and reps, and when to rest. No guesswork required. The calendar follows the three-phase progression outlined earlier: foundation building, explosive power development, and peak performance.
Exercise Video Links Direct links to demonstration videos for every exercise in the program. Proper form prevents injuries and maximizes results. Each video includes common mistakes to avoid and coaching cues for optimal performance.
Nutrition Meal Plan Sample meal plans calibrated for three bodyweight categories: under 160 lbs, 160-190 lbs, and over 190 lbs. Each plan hits protein targets (1.6-2.2g per kg) while providing adequate carbohydrates for explosive training. Includes pre-workout and post-workout meal timing strategies.
Progress Tracking Sheet A printable spreadsheet for logging weekly vertical jump measurements, bodyweight changes, exercise progress, and subjective recovery ratings. Tracking reveals patterns and keeps you accountable. Studies show athletes who track consistently achieve 15-20% better results than those who don’t.
Get Your Free Copy
Ready to start your dunking journey? Enter your email below and we’ll send the complete PDF package directly to your inbox within minutes.
You’ll also receive weekly training tips, form check videos, and motivational success stories from our community of dunkers. Unsubscribe anytime if the content doesn’t serve your goals.
Final Summary: Your Dunk Roadmap
You now understand exactly what it takes to dunk. The calculator removes guesswork. The training program provides a proven path. Your commitment determines the outcome.
Key Takeaways
Use the calculator to know your target. Measure your height, standing reach, and current vertical accurately. Calculate the exact vertical jump you need. This number becomes your North Star—specific, measurable, and achievable.
Measure inputs accurately. Garbage in, garbage out. Use the wall method for standing reach. Test your vertical properly using either the chalk method or verified apps like My Jump 2. Even small measurement errors (2-3 inches) significantly distort your required training timeline.
Follow the 12-week structured program. Random workouts produce random results. Progressive overload through three distinct phases—foundation, explosive power, and peak performance—optimizes gains while minimizing injury risk. Trust the process even when week-to-week progress feels slow.
Focus on strength plus plyometrics. Maximum strength provides the foundation. Plyometrics teach your nervous system to express that strength explosively. You need both. Heavy squats without jumping practice won’t get you there. Jumping without strength development hits plateaus quickly.
Rest and recover properly. Sleep eight hours minimum. Take scheduled rest days seriously. Listen to pain signals. More training isn’t always better—three quality sessions per week with proper recovery often outperform six mediocre sessions with inadequate rest.
Track progress weekly. Measure your vertical every Saturday morning under consistent conditions: same time, same warm-up, well-rested. Progress isn’t linear. Some weeks you’ll gain nothing. Other weeks you’ll jump two inches higher. Tracking reveals the overall upward trend and keeps you motivated through temporary plateaus.
Your Next Steps
The information is yours. The program is proven. The only missing ingredient is action.
Calculate your numbers now. Don’t wait for Monday or next month. Go to a wall right now and measure your standing reach. Test your current vertical tomorrow. Knowing your specific numbers transforms vague dreams into concrete goals.
Take baseline measurements. Write down today’s date, height, standing reach, vertical jump, and bodyweight. Take a photo or video of your current jumping ability. Six months from now, you’ll want to remember where you started.
Start Phase 1 this week. Not next week. This week. Even if you only complete two workouts, starting builds momentum. The first workout is always the hardest because it represents commitment. Once you start, continuing becomes easier.
Download the free PDF. Scroll back up and grab the complete training calendar, exercise videos, nutrition plan, and tracking sheets. Having resources organized in one place removes friction and excuses.
Join our community. Connect with other athletes pursuing the same goal. Share progress videos. Ask form check questions. Celebrate milestones together. Solo training works, but community accountability accelerates results and makes the journey more enjoyable.
Performance Tracking Tip: Monitor Your Long-Term Trajectory
Most athletes quit too early because they judge progress over days or weeks instead of months. Your vertical won’t increase linearly—expect two steps forward, one step back.
Set up a simple spreadsheet with these weekly data points: vertical jump measurement, bodyweight, training volume (total sets × reps), sleep quality (1-10 rating), and subjective recovery (1-10 rating). After 12 weeks, graph your vertical jump against time.
The trend line matters more than individual data points. A 6-inch gain over three months averages just 0.5 inches per week—easy to miss in day-to-day variation but transformative over time. Athletes who track consistently maintain motivation through inevitable plateaus because they see undeniable long-term progress.
Review your data monthly. If progress stalls for three consecutive weeks, change one major variable: increase training volume by 20%, add an extra rest day, or adjust exercise selection. Give each change 4-6 weeks before judging effectiveness.
Remember: the dunk calculator showed you the destination. The training program provides the vehicle. Consistent tracking ensures you’re moving in the right direction, adjusting course when necessary, and ultimately arriving at your goal of throwing down your first dunk.